Step Graphics: 3 basic Yoga poses

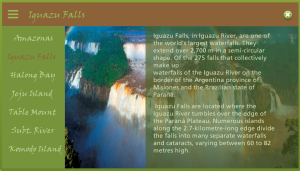
Step graphics are interactive explanations that make it easy for learners to sequentially walk through a process, workflow, procedure, or related items. They can be used for all types of learning interactions, from procedural training to interactive storytelling.

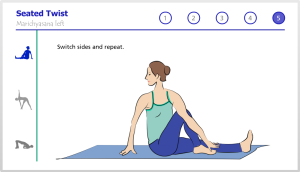
The aim of Weekly Challenge nº 36 was to create a step graphic to communicate a process. I started to take Yoga lessons last year, so I was inspired to create a quick guide of Yoga poses for beginners.

There are tons of free videos of yoga, but I needed my own characters showing the pose step by step. At the website yoga.com, I found good tutorials of the poses I had decided to illustrate. Pausing the videos at every change of position, I took 4-5 screenshots of every sequence. After that, I drew every image in an illustrated style, using Illustrator’s calligraphic brushes. Finally, I created a slide for every pose in Storyline.
Yoga-poses.

Reference: Yoga.com


Navigation menu: 7 Wonders of Nature

7_Wonders_NatureThis week challenge #79 was about creating a custom Navigation Menu. In coincidence with the Earth Day, I decided to quickly build a demo showing the 7 Wonders of Nature, based on the list of The New 7 Wonders of the World. In this demo, navigation combines drop-down menu and Next-Prev buttons, everything created in Storyline, playing with triggers and states. For every slide, description of the Wonders are based on Wikipedia and all images are Creative Common licenced. Click on the image and learn more about these beautiful places!

Free Safety Icons

Weekly Challenge nº78 is about creating our own icon set to share with the e-learning community. In the recent Challenge, nº73 Design a Cover for an odd title of an eLearning course, I had chosen the theme of Workplace Safety Course. This time, I decided to create the icons for that course, and as I’ve just started using Illustrator; this was a perfect opportunity to practice.

Safety-iconsThe Style

Inspired by this free set of icons from Freepik, I applied the same colors and style to my icons. Except from the Food safety icon, I drew the rest using Illustrator, combining shapes and lines. For the Chemical safety icon, I modified one of the icons I used in the Cover mentioned above.

Feel free to download my Set of Safety icons

Create free animations online with Animatron

Animatron is a simple and powerful online tool that allows you to create free HTML5 animations and interactive content. Creating your first animation is a very easy process:

  • In the Design Editor, upload your own assets like images, characters and backgrounds or create them using the site’s vector drawing tools and libraries
  • In the Animation Editor, add cue points in the timeline to add motion paths and change the size and shape of your figures. Or, you can create multiple scenes with different images.
  • Finally, publish your project in html or download it as video or GIF image.

If you’re using the free subscription, you can only create 20 projects of a maximum of 10 seconds each one, and they’ll have public visibility.

Highly recommended online tool!. Below, a simple animation I created to illustrate the glacial abrasion process:

Glaciar_abrasion


Educational animations: Classification of River Deltas

“Educational animations are an effective way to create focal points, illustrate complex procedures, and help learners visualize change. Combined with controls like interactive sliders, learners can pause, replay, and control playback speed and direction to assist learning and comprehension.”

So begins ELHChallenge nº76, describing and including in one phrase, the benefits of animations used for educational purposes.

This time, and continuing with themes of Geography, I decided to transform the Diagram which classifies the types of river Deltas, into something more interactive, creating animations to show the evolution of these landforms.After searching the web, I found diagrams of the evolution of Mississippi and Ebro deltas. I used Illustrator to vectorize the images and uploaded them to Gifmaker.me to create a video. In the case of tide-dominated delta, I didn’t find a concrete example, so I drew the images and followed the same process.

Delta-types

Finally, on a world map, I placed markers for the most representative deltas of each category, and linked them to Google Maps.

Download my animations from Wikkimedia Commons:

How U-shaped Valleys are formed?: Show a process with animation and images

Glacial_valley_formationIt’s been a while since I’ve decided to start making my own images and animations. Animations and sequences of images are perfect to show processes; to illustrate changes in time and over space.

I had some notes from the time I taught Geography, and after searching some information on the web, I decided to illustrate the formation of a U-shaped Valley.

Using Artweaver, I drew a valley diagram, and combining layers, I got the different stages of the advance and retreat of a glacier and the resulting U-shaped valley. After exporting all the images; I used them to make a GIF file with GifMaker. There were two specific erosional processes at the base of the glacier, which I considered it was better to represent them separately, so I sketched two simple animations using Animatron.

On NASA’s website, I found amazing photographic files of the retreat of (still) existing glaciers.

Finally, I put all together: information, images and animation, using Storyline.

Download my animation from Wikkimedia Commons

View this project in Spanish: Formación de un Valle Glaciar

Information contained in this demo is based on scientific and educational resources. Below, some of the references I used:

Wikki Books: Glacial erosion and deposition

The Geography Site: Valley Glaciers.

USGS: A glacier carves a U-shaped Valley

Physical Geography.net: Glacial erosion 

Drawing with Artweaver: my first digital paintings

When I was a child I took drawing classes for some years and learnt the main drawing and coloring techniques such as using pencils, pastels, watercolors, charcoals, etc. That was a long time ago, it was a hobby I had left behind, but now that I decided to design e-learning, sometimes I struggle to find the right images to illustrate the content.

So I thought it was good getting back to the basics and try to create my own artistic drawings. Nowadays we can easily convert a picture into a drawing applying filters and photo effects. But I think having basic graphic skills allow us to create and customize our own images.

Searching for free a illustration software, I found Artweaver; a full-featured painting tool recommended in various threads of ELH Community.

After having created my first drawings I can really recommend this tool. Artweaver comes with a huge set of predefined brushes, which are very realistic, they reminded me my pencils and brushes and I quickly started sketching and painting as in the old days.

Check some of them in the slideshow below:

It also lets you control layers, create transparent backgrounds, and apply filter effects, so it not only works great for painting, but also for image edition.  Check all the features for the free and paid versions.